This chapter introduces the book’s main goal: building a voice-enabled AI chat application that runs entirely on your Mac. Instead of relying on a hosted chatbot, you will create a private local assistant that transcribes speech, generates responses, and keeps your voice, prompts, and outputs on your own machine. The project is framed as both a practical app and a way to learn how the pieces of a local AI system fit together.
To do that, the chapter explains the core tools and ideas you will use, including Ollama for running language models locally, MLX Whisper for speech recognition, VS Code for editing code, Python for scripting, and Streamlit for the web interface. It also gives a gentle introduction to large language models, prompts, and APIs, emphasizing that LLMs predict likely text patterns rather than truly understand language, which is why they can sometimes produce convincing but incorrect answers. The chapter makes the case for local AI by highlighting privacy, offline use, lower cost, control, and the value of understanding how the system works under the hood.
The chapter then prepares you to work comfortably in macOS Terminal, since the rest of the book depends on it. It explains the difference between GUI and CLI workflows, shows how to open Terminal, and walks through essential commands such as pwd, ls, cd, mkdir, and clear. By the end, you are expected to be able to navigate folders, inspect directory contents, create a project workspace, and understand the basic mechanics of how terminal commands are interpreted, setting up a solid foundation for the coding chapters ahead.
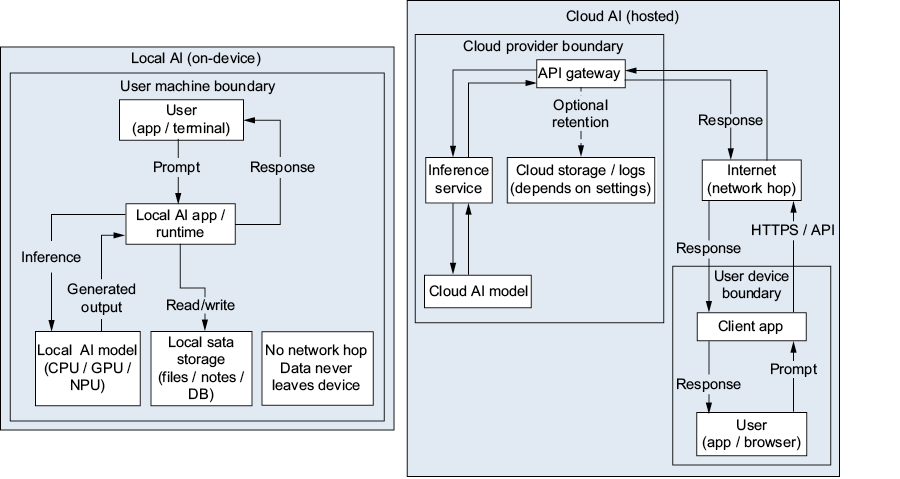
Cloud AI (right) sends your prompt across the internet to a hosted inference service, and your data may be stored on the company’s servers. Local AI (left) keeps the prompt, the model, and the response inside your machine: no network hop, no external server, and no data leaving your control.
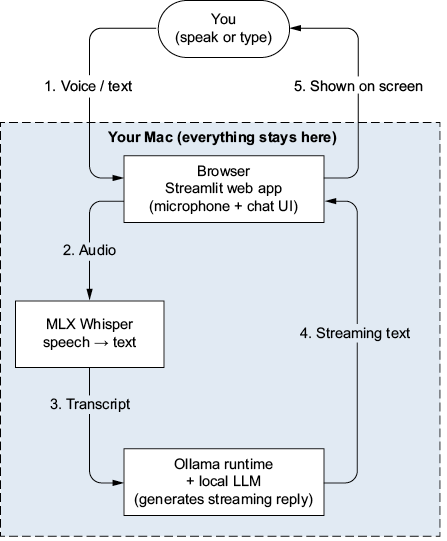
Overview of the voice chat application. Your Mac runs three components locally: a Streamlit web app in the browser captures your voice and renders the chat, MLX Whisper transcribes your speech to text, and Ollama runs the LLM that generates the streaming reply. The dashed boundary marks the limits of your machine—nothing crosses it.
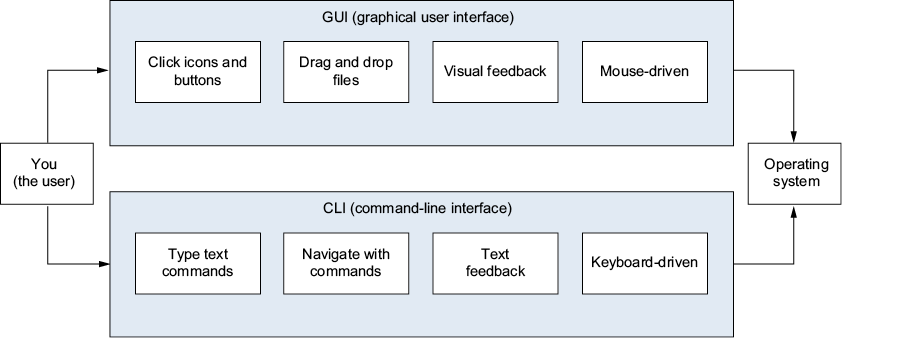
The GUI and the CLI offer different features, but both communicate with the computer’s operating system. Clicking in the GUI and typing in the CLI ultimately reach the same destination.
Summary
- This book teaches you to run an LLM on your own computer and build a local voice-enabled AI chatbot using Ollama, MLX Whisper, Python, and Streamlit.
- An LLM learns patterns in text and generates responses by predicting the most likely next word, one at a time. It can also hallucinate, producing a confident but inaccurate answer, so important results are worth verifying.
- Local AI keeps your data on your machine; cloud AI sends it to a company’s server. The tradeoff of using local AI is model size and recency, but local models are highly capable and improving rapidly.
- A terminal is a text-based interface to your computer, also called a CLI (command-line interface).
- The GUI (clicking icons) and CLI (typing commands) both talk to the same operating system; they are just different interfaces.
- Developers use the CLI for its speed, precision, automation, and portability, and increasingly because AI coding agents themselves run in the terminal.
- To open the terminal on macOS, press Command-Space to open Spotlight Search, and then type “Terminal.”
- Four essential commands let you navigate your filesystem:
pwddisplays your current location,lslists files and folders,cdchanges directories, andmkdircreates a new folder. - The
-laflags inls -lacan be stacked after a single hyphen:-lfor long format and-afor all files, including hidden ones. - The shell (e.g., Zsh) is the program inside the terminal that interprets commands. It searches a list of directories called the PATH to find and execute commands.
- Ctrl-C cancels a running command.
- Error messages are helpful feedback, not signs of failure.
FAQ
What will I build in this chapter?
You will build a voice-enabled local AI chat application on your Mac. It will let you speak into your microphone, transcribe your speech to text, and receive a streaming AI response, all running locally without sending your data to the cloud.Why should I run AI locally instead of using a cloud chatbot?
Running AI locally gives you stronger privacy, voice privacy, offline use, full control, no subscription fees, and a better understanding of how the system works. Your prompts, audio, conversations, and responses stay on your own machine.What are the main tools used in this book?
The book uses Ollama for running language models, MLX Whisper for local speech recognition, VS Code for editing code, Python for programming, and Streamlit for building the web app interface.What do I need before starting the project?
You need a recent Mac running macOS Ventura 13 or later, at least 8 GB of RAM, and about 20 GB of free disk space. A stable internet connection is needed at first to download tools, packages, and models.Do I need programming or machine learning experience to follow this chapter?
No prior machine learning experience is required, and you do not need command-line experience either. Basic Python knowledge will help later, but the chapter is designed to teach concepts from the ground up.What is a large language model in simple terms?
An LLM is an AI trained on huge amounts of text to learn patterns in language. It generates responses by predicting the next word or token one step at a time, which is why it can sometimes produce inaccurate but confident-sounding answers.What is the terminal and why is it important?
The terminal is a text-based way to interact with your computer by typing commands. It is important because the tools in this book, including Ollama, Python, and Streamlit, are controlled from the terminal.How do I open Terminal on macOS?
The recommended way is to press Command-Space to open Spotlight Search, typeterminal, and press Enter. You can also find Terminal in Finder under Applications > Utilities.What are the four essential terminal commands in this chapter?
The chapter introducespwd to show your current location, ls to list files, cd to change directories, and mkdir to create folders. It also mentions cd .., cd ~, and clear as helpful related commands.
 Build Applications with Local AI Models on a Mac ebook for free