10 The Flux Workflow
This chapter introduces Flux.1-dev, a powerful open image generation model from members of the original Stable Diffusion team, and walks through how to use it in ComfyUI. It contrasts Flux’s workflow with SD1.5 and SDXL, emphasizing where it differs and what new configuration options it brings. The focus is on getting the most out of Flux despite its higher memory demands, understanding its new guidance system and sampler controls, and learning practical tweaks that improve prompt adherence, style handling, and realism.
Getting started involves loading a dedicated ComfyUI workflow and, unlike classic single-checkpoint setups, separately loading Flux’s components: two text encoders (CLIP-L and T5-XXL), the Flux VAE, and the UNet. Because Flux.1-dev is VRAM-hungry, the chapter shows how to swap in a quantized fp8 UNet to roughly halve memory use with only a minor quality trade-off, enabling generation on more constrained GPUs. It also explains the DualCLIPLoader, which combines two encoders to boost prompt understanding, and notes that while ComfyUI lets you “just run” the graph, understanding these parts helps you troubleshoot and improve results.
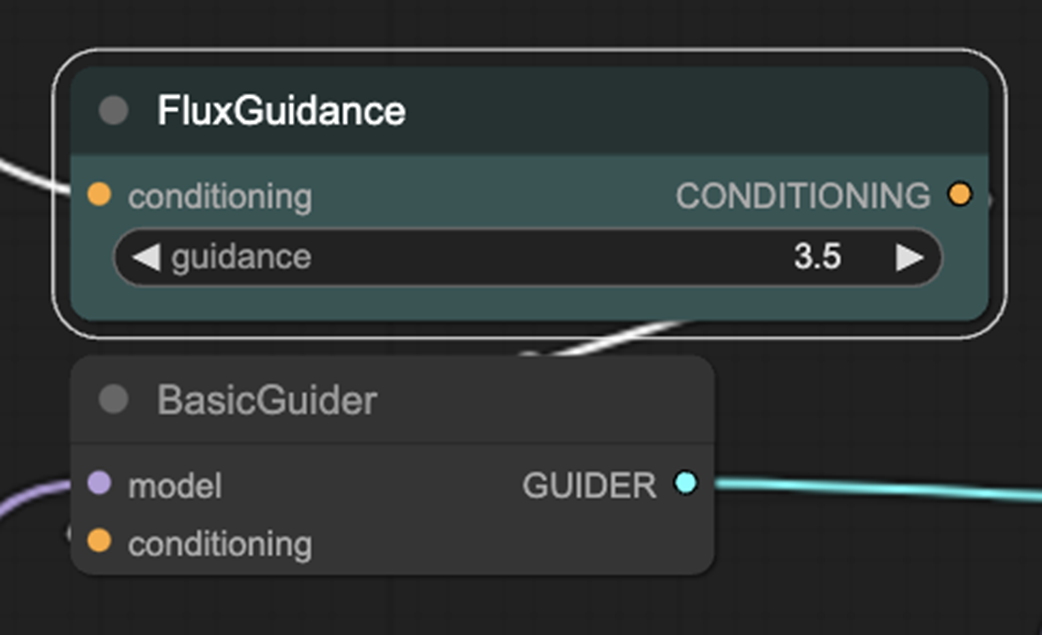
Flux replaces classic CFG with a Guidance mechanism (via FluxGuidance and BasicGuider), where lowering guidance often improves style adherence and reduces the plasticky look in photorealistic prompts. Sampling is more elaborate: RandomNoise adds seed behaviors (fixed, increment, decrement, randomize); ModelSamplingFlux exposes base_shift and max_shift to shape the denoising schedule (max_shift has clear visual impact, base_shift is subtle and can be resolution-dependent); and BasicScheduler keeps familiar scheduler/steps while adding a sensitive denoise control that should be tuned in very small increments. The chapter wraps with practical notes on latent size and batch size constraints, and underscores that Flux’s new levers can materially change outcomes and partially overcome current limitations, with deeper style solutions coming later via LoRAs.
Drag this image to ComfyUI to get the Flux workflow.

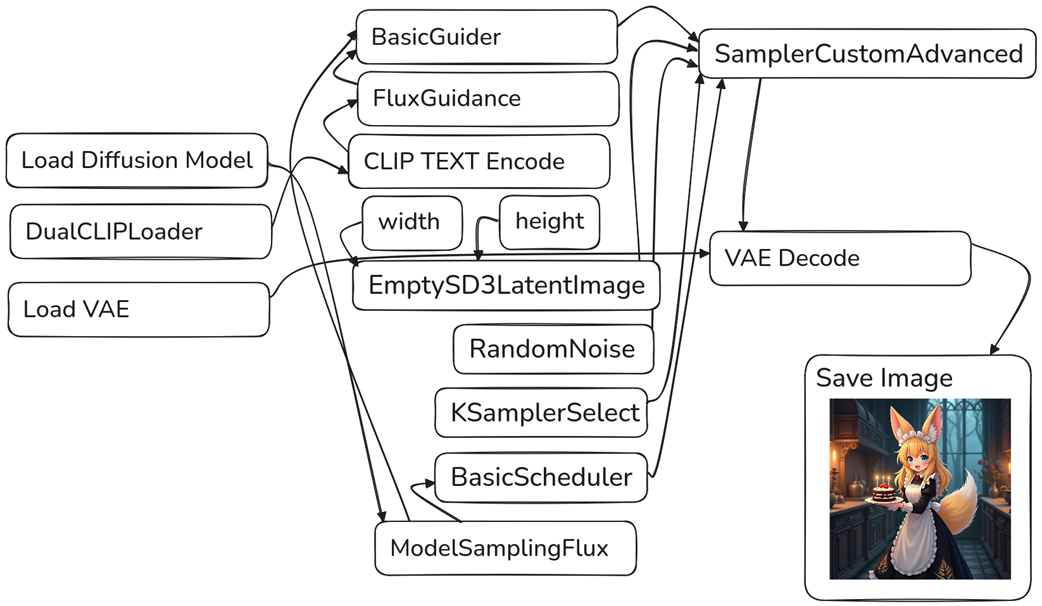
The Flux workflow is notably different than SD1.5 and SDXL
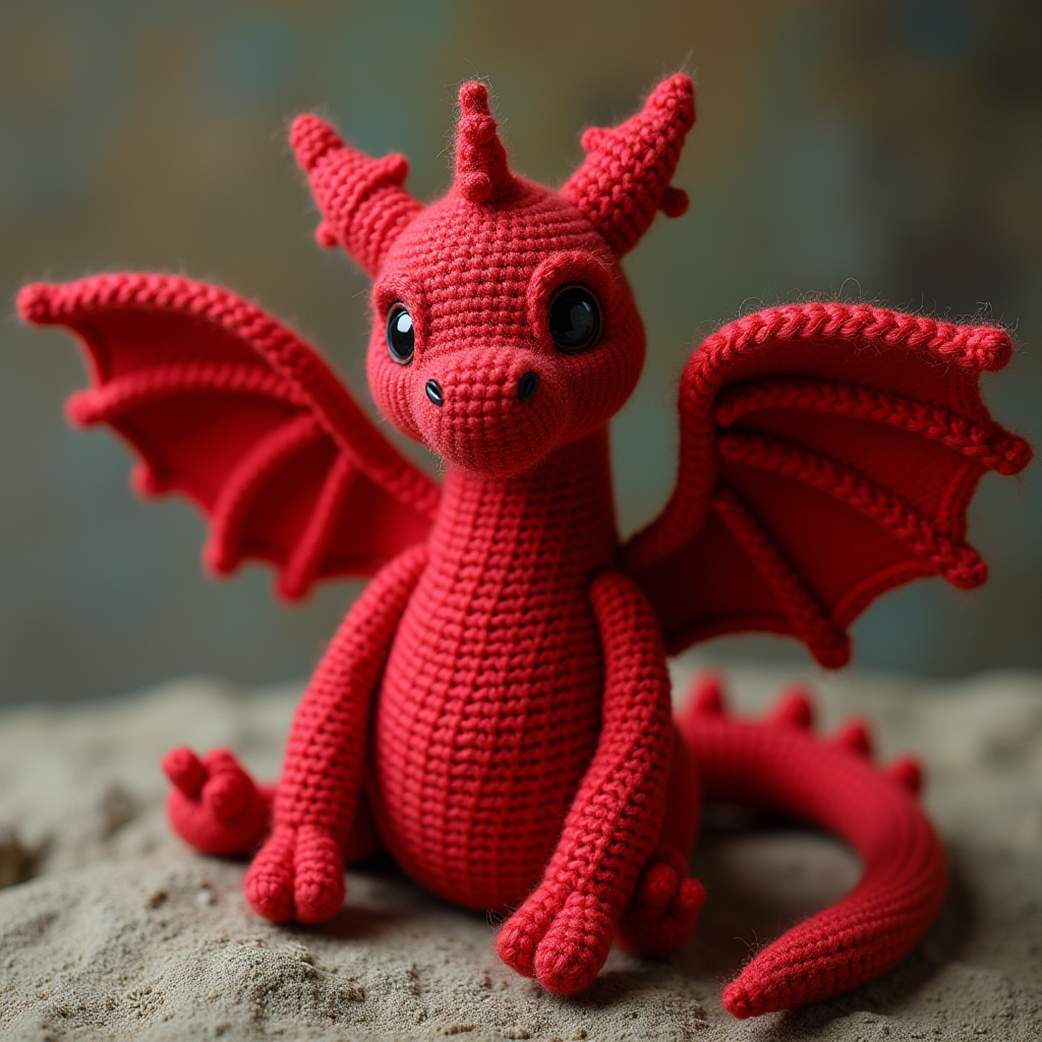
Our adorable first image from Flux
The Load Diffusion Model node allows you to select the U-NET.

Using the fp8 model only minorly impacts the quality of our output.
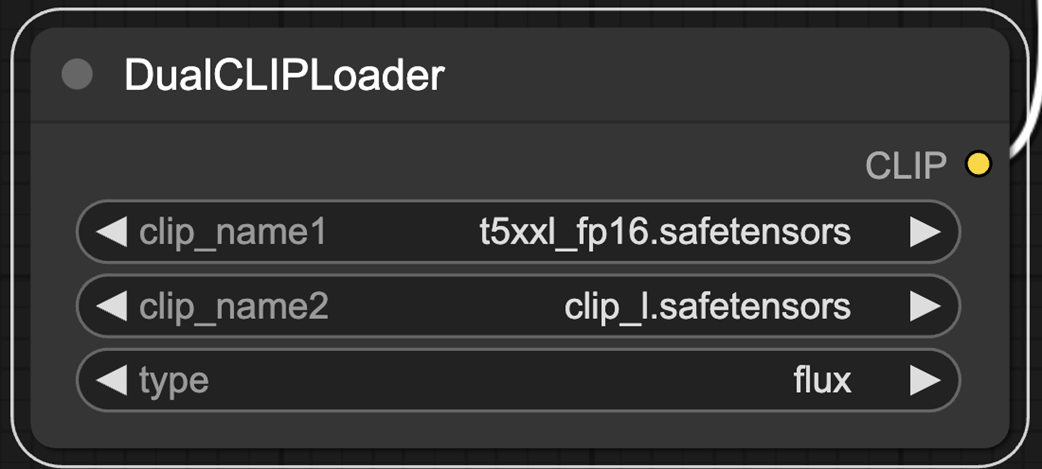
The DualCLIPLoader allows us to use two CLIP encoders.
FluxGuidance and BasicGuider nodes.
The Guidance parameter in Flux can help the model adhere to style better.
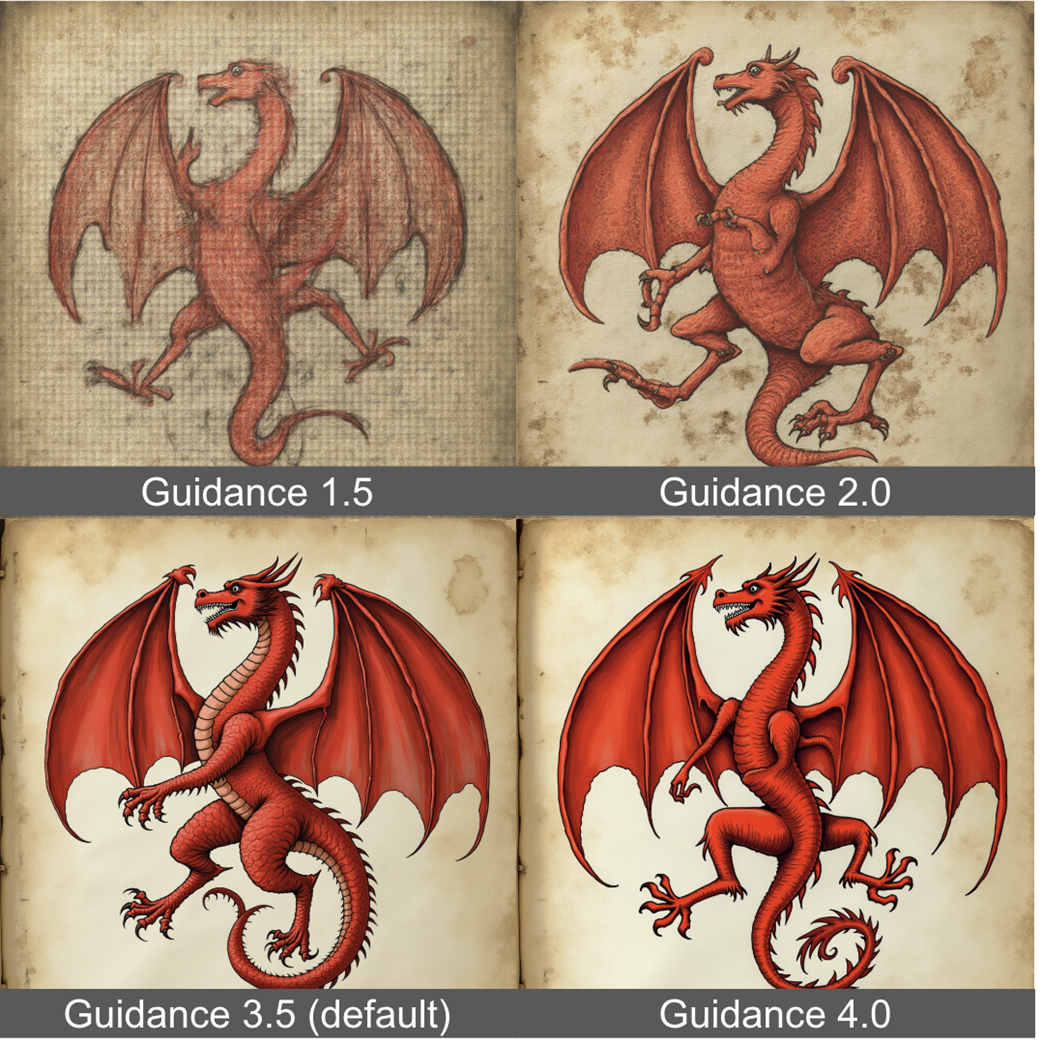
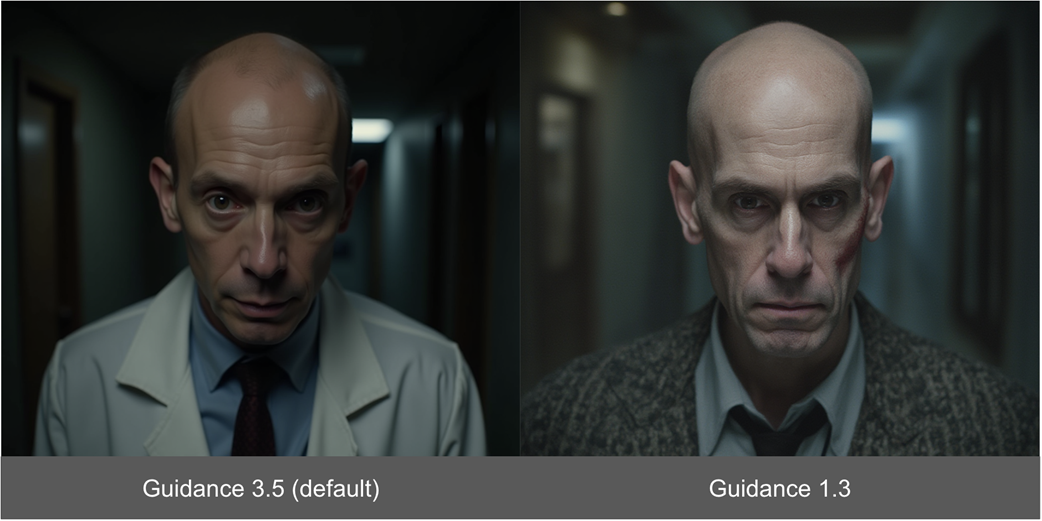
Lower Guidance also helps to make images look less “plasticy”.
Sampling is notably more complex when working with Flux.
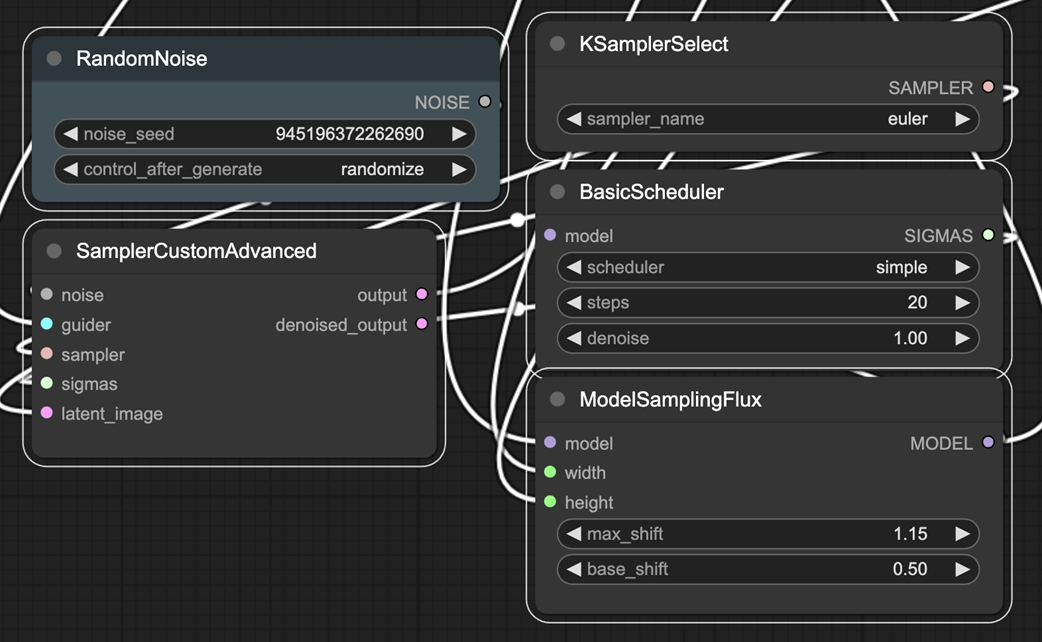
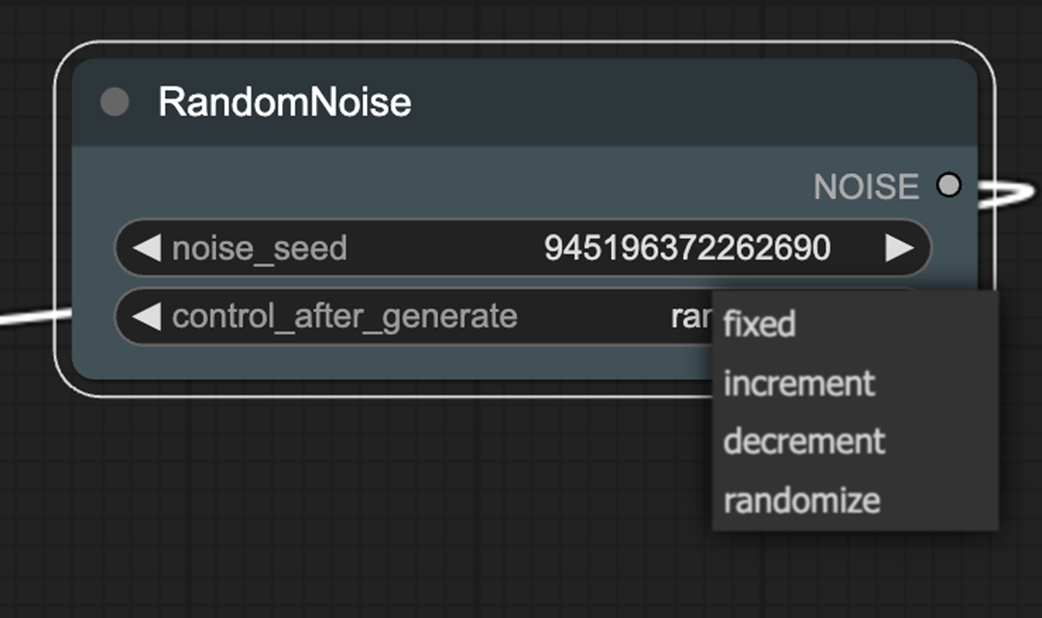
RandomNoize adds a control_after_generation option.
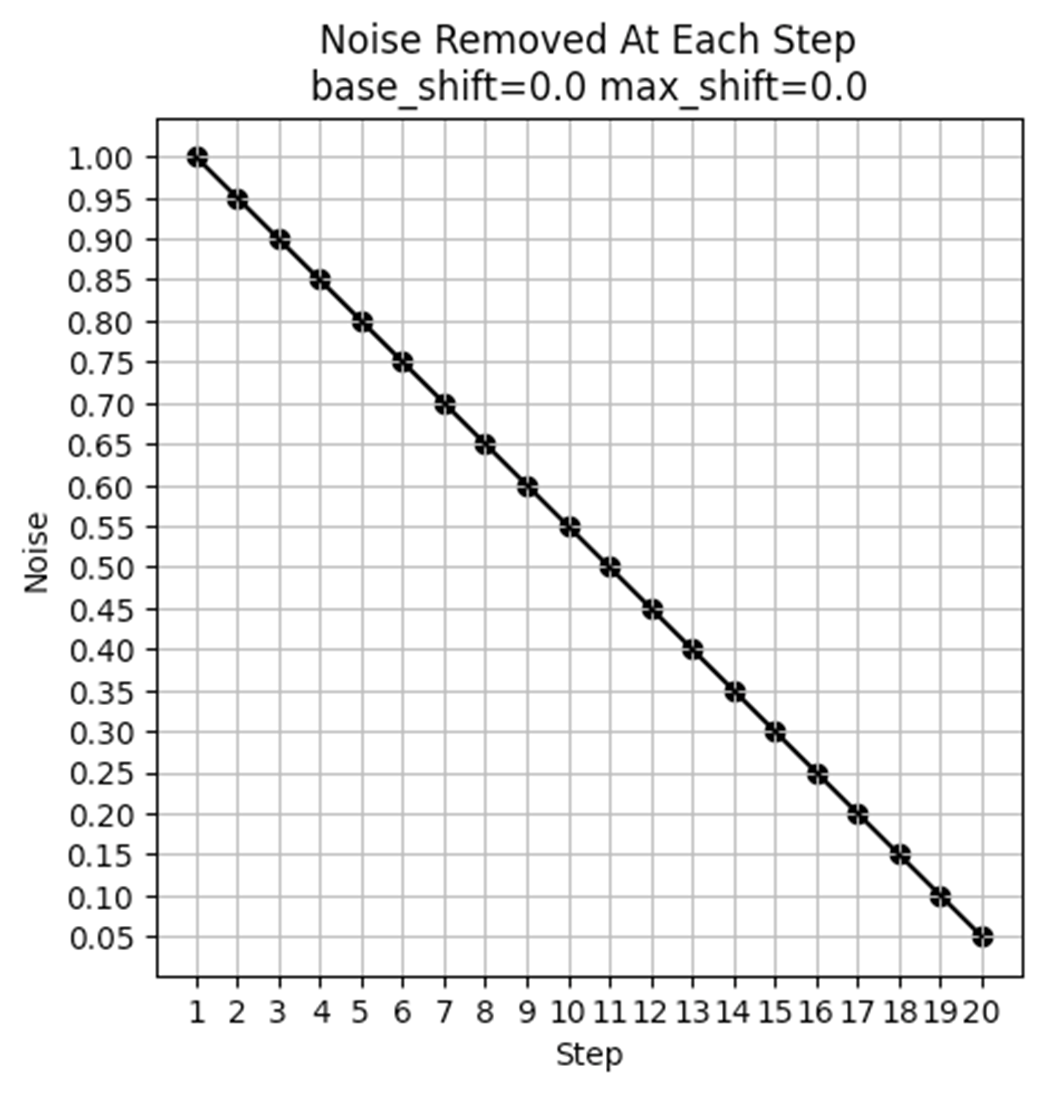
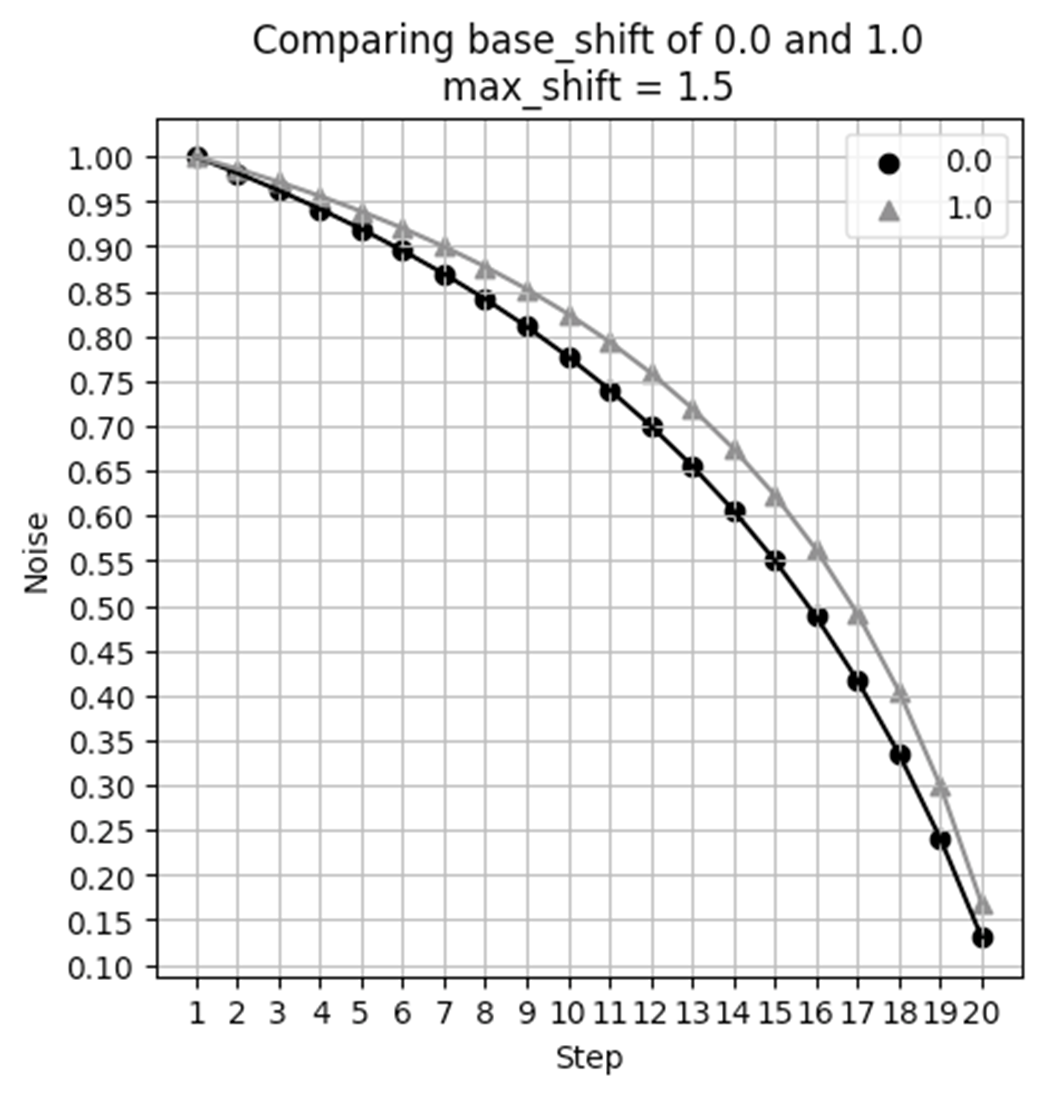
Noise Schedule when max_shift and base_shift both are 0.0.
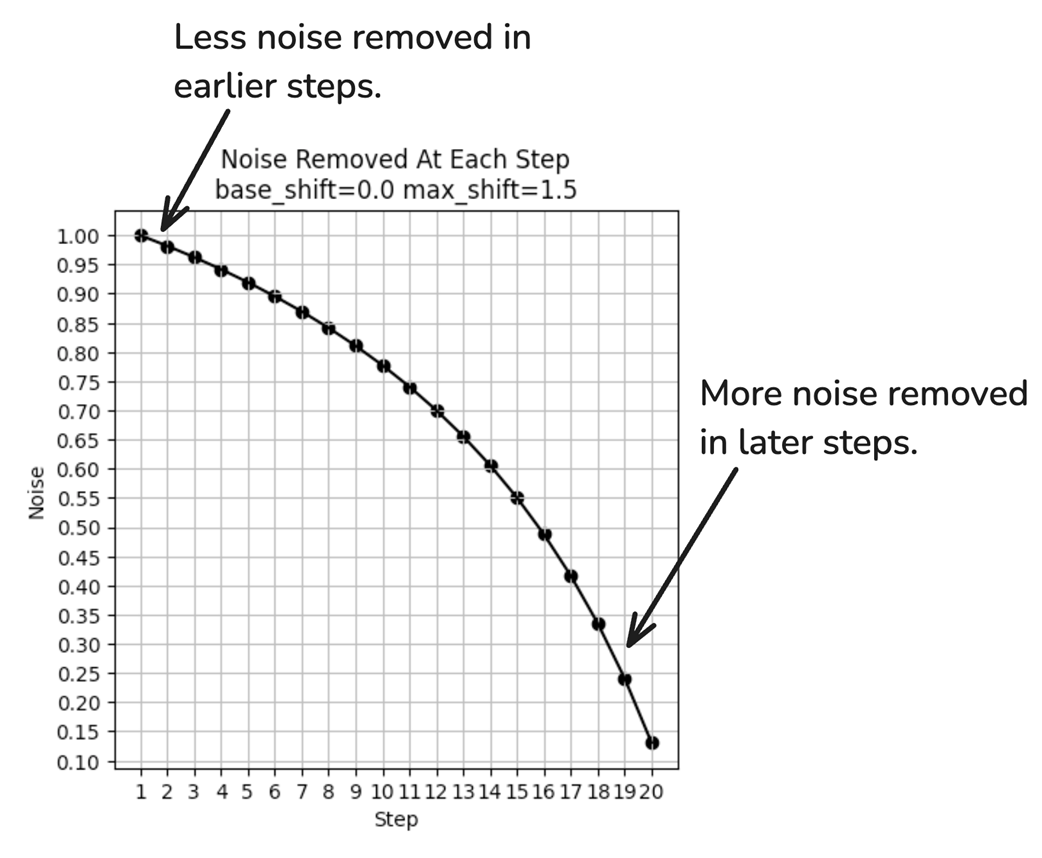
With max_shift of 1.5, the noise removal is no longer uniform.
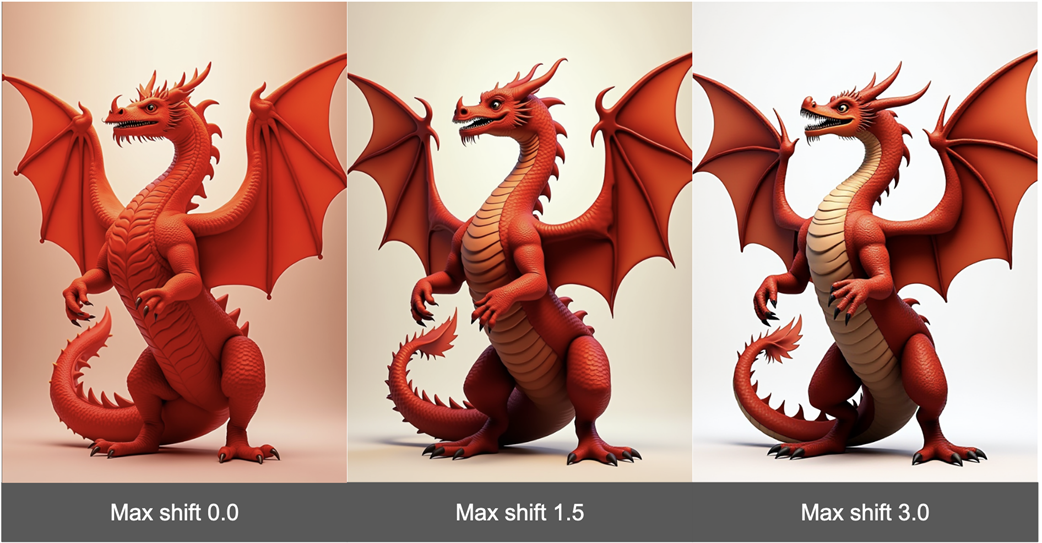
Max shift can have a notable impact on the resulting image generated.
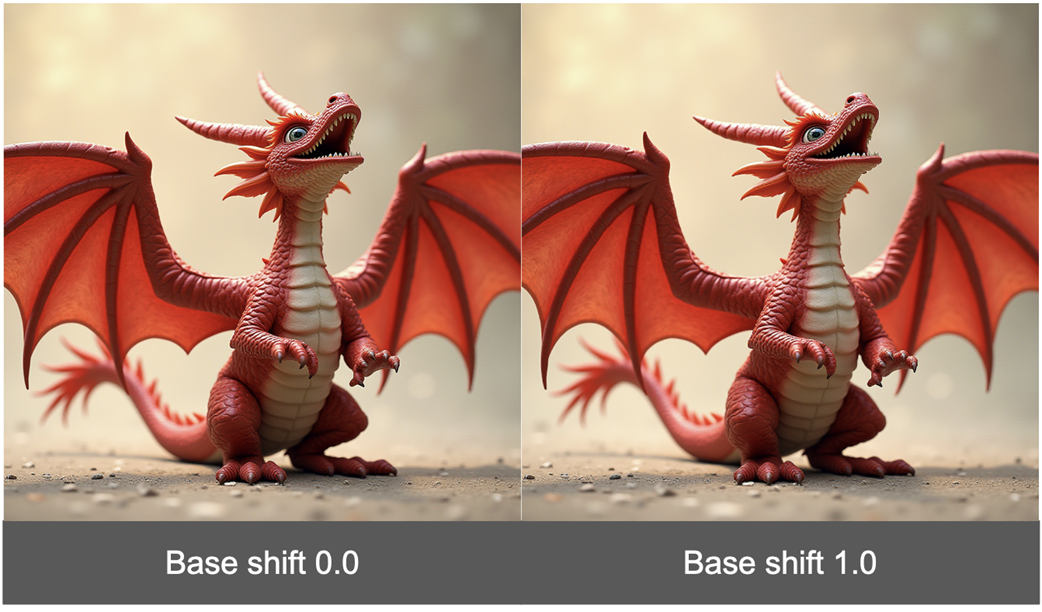
Base shift slightly modifies the denoising curve.
While there is a difference in images, it is more subtle.
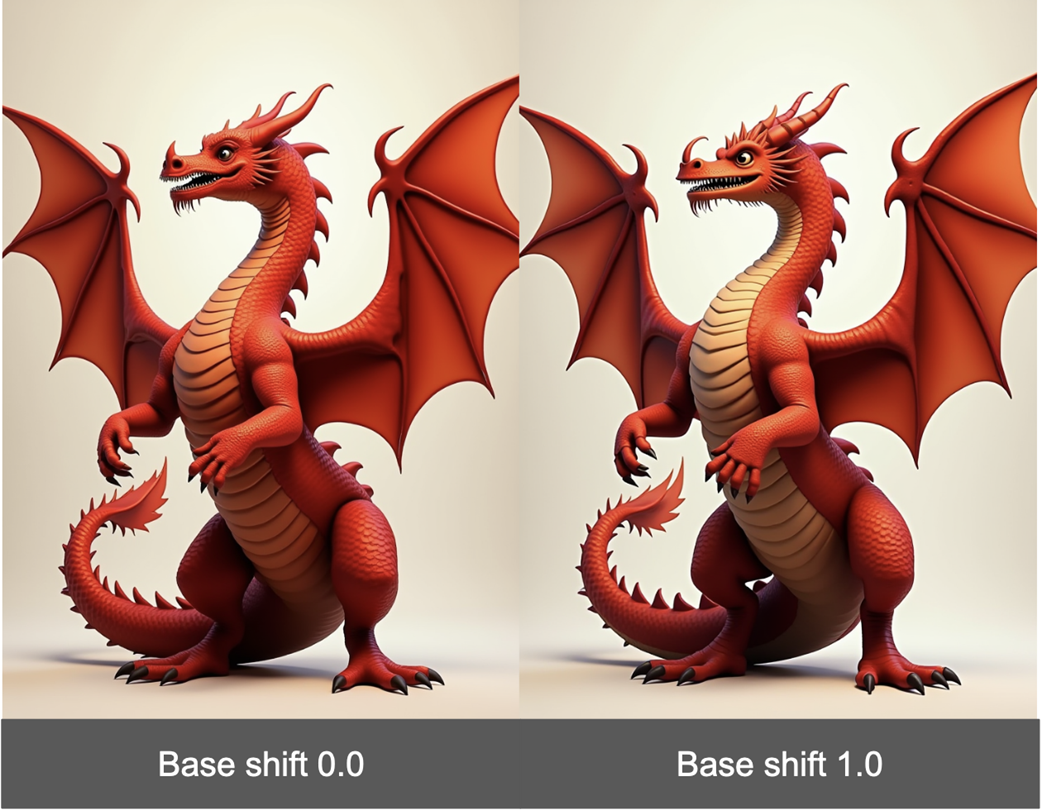
Under some aspect ratios, base_shift has no impact at all!
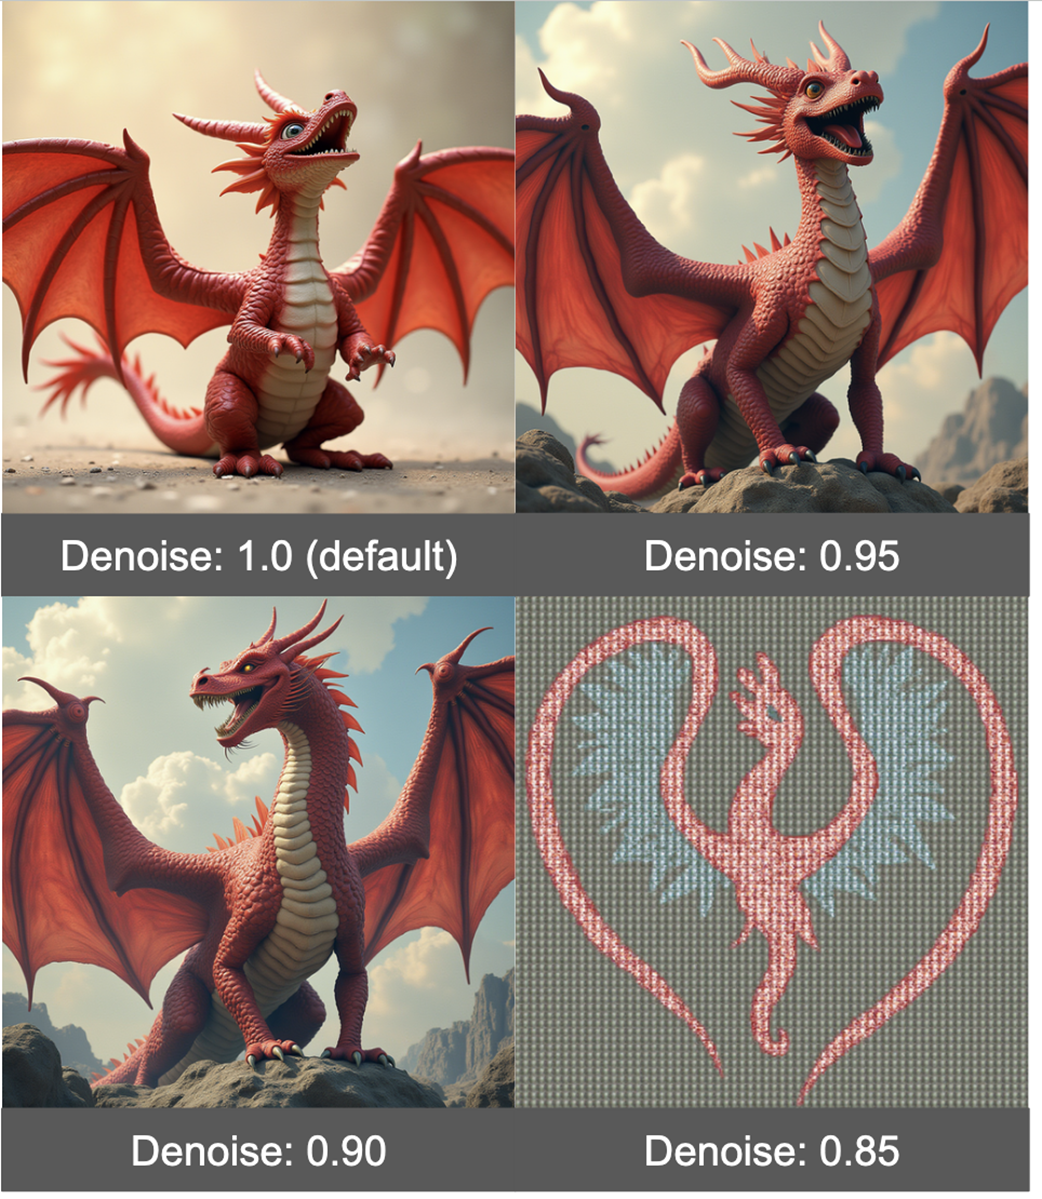
Denoise should be changed in very small increments
Summary
- The Flux workflow has quite a few differences from the standard Stable Diffusion workflow.
- When working with models requiring high memory, it is helpful to look for quantized versions of these models.
- Part of the reason Flux is so good at prompt adherence is because it uses two CLIP encoders.
- Guidance in Flux is similar to CFG in SD1.5 and SDXL, but doesn’t allow for a negative prompt.
- Reducing Guidance can help the model pay more attention to the style recommended in the prompt.
- Flux allows for much more nuanced control over scheduling.
- Max shift can have a pretty major impact on your final result, but base shift is less impactful and in many cases will have no impact at all.
- Reducing the Denoise value can make the image look nicer, but should only be done in very small steps as it can quickly degrade the image.
FAQ
How do I load and run the official Flux workflow in ComfyUI?
Go to the ComfyUI Flux examples page at https://comfyanonymous.github.io/ComfyUI_examples/flux/ and drag the example image into ComfyUI. The workflow is embedded in the image. After you place the required model files (see below), enter a prompt and click “Queue Prompt.”Which files are required for Flux.1-dev and where do I put them?
- Text encoders (to ComfyUI/models/clip): clip_l.safetensors and t5xxl_fp16.safetensors (https://huggingface.co/comfyanonymous/flux_text_encoders/tree/main)- VAE (to ComfyUI/models/vae): ae.safetensors (https://huggingface.co/black-forest-labs/FLUX.1-schnell/blob/main/ae.safetensors)
- UNet (to ComfyUI/models/unet): flux-1dev.safetensors (https://huggingface.co/black-forest-labs/FLUX.1-dev/tree/main). Note: place in models/unet, not models/checkpoints.
I’m running out of VRAM. How can I make Flux fit on my GPU?
- Use the quantized UNet: flux1-dev-fp8.safetensors (https://huggingface.co/Comfy-Org/flux1-dev/blob/main/flux1-dev-fp8.safetensors). It uses ~half the VRAM with only minor quality loss.- In “Load Diffusion Model,” set unet_name to flux1-dev-fp8.safetensors.
- Keep batch_size at 1 and reduce resolution if needed.
- Macs with large unified memory (M‑series) can run Flux more easily.
 A Damn Fine Stable Diffusion Book ebook for free